
This post may contain affiliate links. Please read our disclosure policy.
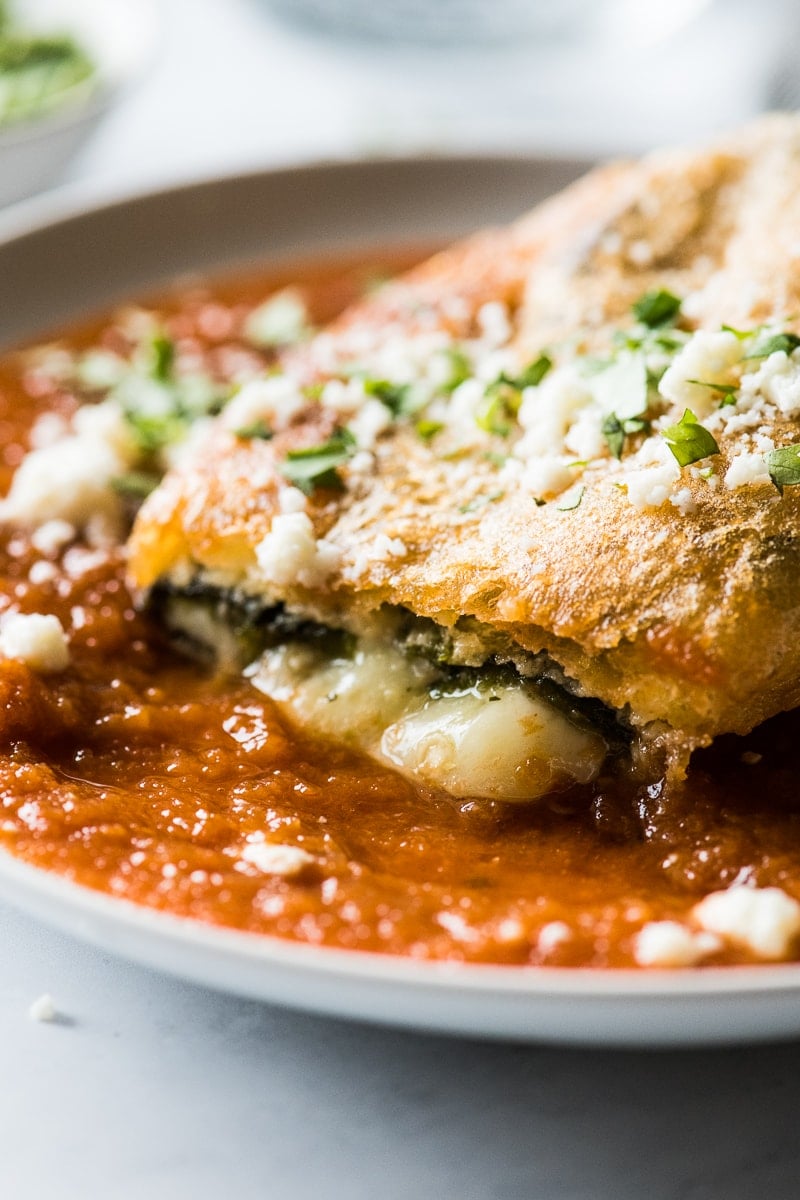
An authentic chile relleno recipe made from roasted poblano peppers stuffed with cheese, dipped in a fluffy egg batter and fried until golden brown! This traditional Mexican dish is fun to make and better than any restaurant version you’ll ever try!
Chile rellenos were one of my favorite things to eat growing up. My mom often made them during the season of Lent since they don’t contain any meat, but these peppers are way too good to only be served at that time.
Luckily, she spoiled us and made them for my family throughout the entire year. I could never say no to peppers stuffed with loads of melted ooey-gooey cheese and fried in a light and fluffy batter. Could you?!
After a few years of having the recipe on my to-make list, I’ve finally perfected it and am so excited to be sharing it with you!
What are chile rellenos?
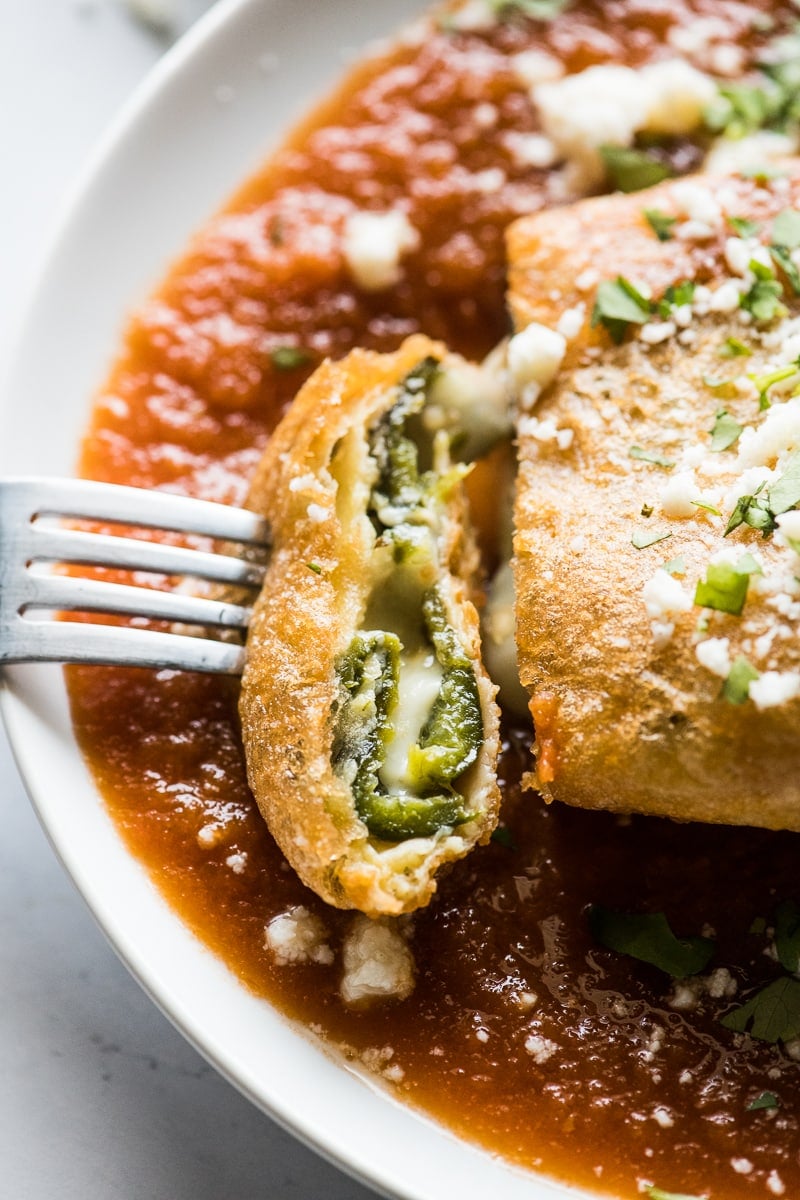
Chile rellenos (or ‘stuffed peppers‘ in English) are a traditional Mexican dish made from roasted poblano peppers stuffed with cheese, then coated in a fluffy egg batter and fried until golden brown.
They’re sometimes served with a simple red or green salsa, or even wrapped in a tortilla with refried beans to make chile relleno burritos.
How to make chile relleno
First, prepare your poblano peppers by roasting them in the oven or on the stovetop, and then removing the blistered and blackened skin. This softens the skin and makes them super easy to stuff.
I’ve included instructions on how to roast the peppers in the recipe card below, but if you’re looking for step-by-step photos of this process, check out this post on how to roast poblano peppers which goes into more detail that’s extra helpful for beginners.
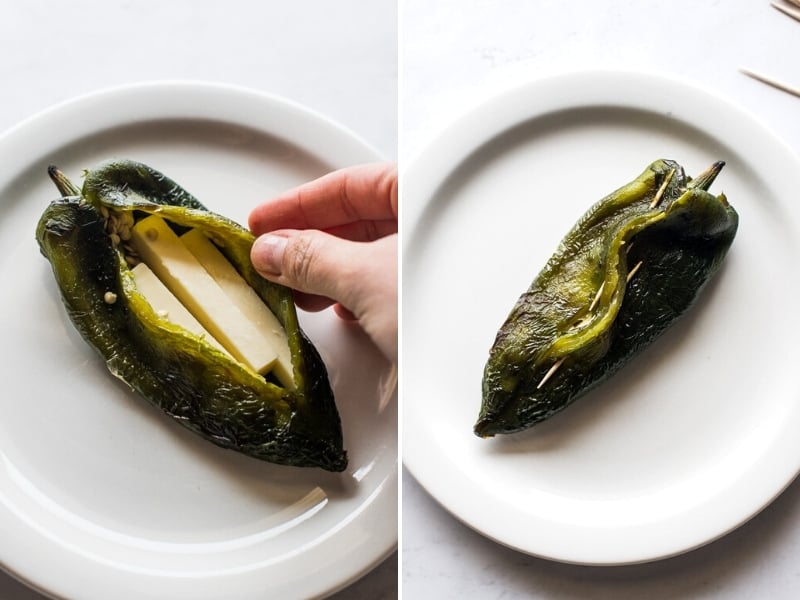
Once your peppers are roasted and the skins are peeled, gently cut a slit down the middle of the pepper with a knife and stuff them with cheese. I used a block of Monterey Jack cheese that I cut into strips, but you could also use shredded cheese if you prefer.
Then carefully close the peppers and bring the edges of the slits together. Secure the edges together with a toothpick or two so the cheese doesn’t fall out of the chiles.
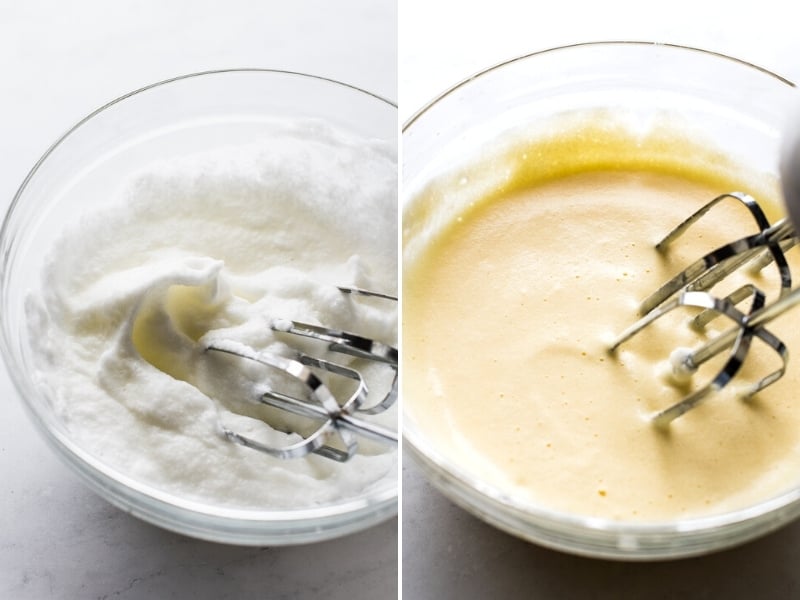
Next, make the egg batter by separating the yolks and whites from 3 eggs. Place the egg whites into a large mixing bowl and the yolks into a small bowl.
Using an electric hand mixer, beat the egg whites until they become stiff peaks form, about 3-5 minutes. Then continue beating them on low and add in egg yolks one at a time until they’re all mixed together. The batter should be light, fluffy and golden yellow.
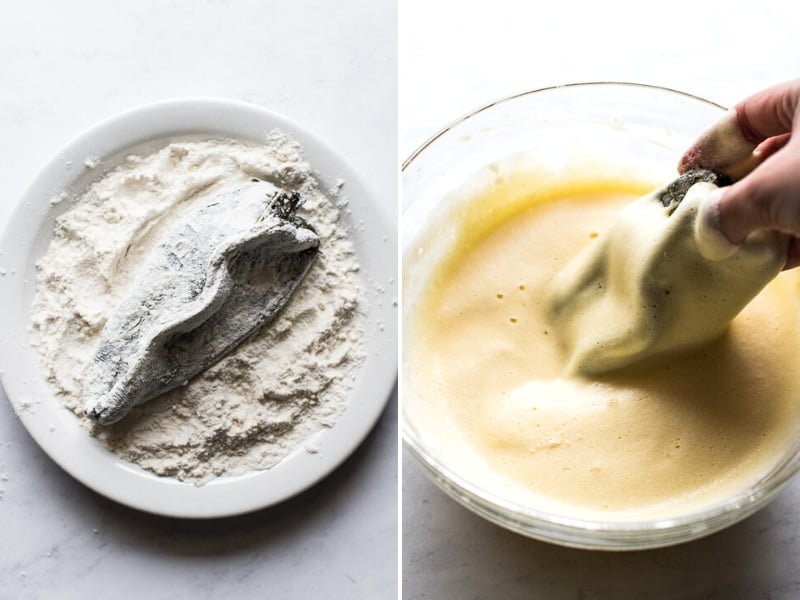
To coat the chiles, I recommend setting up an assembly line with the peppers on the left, all-purpose flour mixture in the middle and the egg batter on the right.
Using one hand, grab a stuffed pepper and roll it in the plate of all-purpose flour. Make sure it’s coated on all sides, and then give it a tap to remove any excess flour.
Then using your hand, grab the flour-coated pepper and dip it into the egg batter. Make sure it’s also coated on all sides. Quickly and gently place the pepper in the hot frying oil and fry on both sides until golden brown.
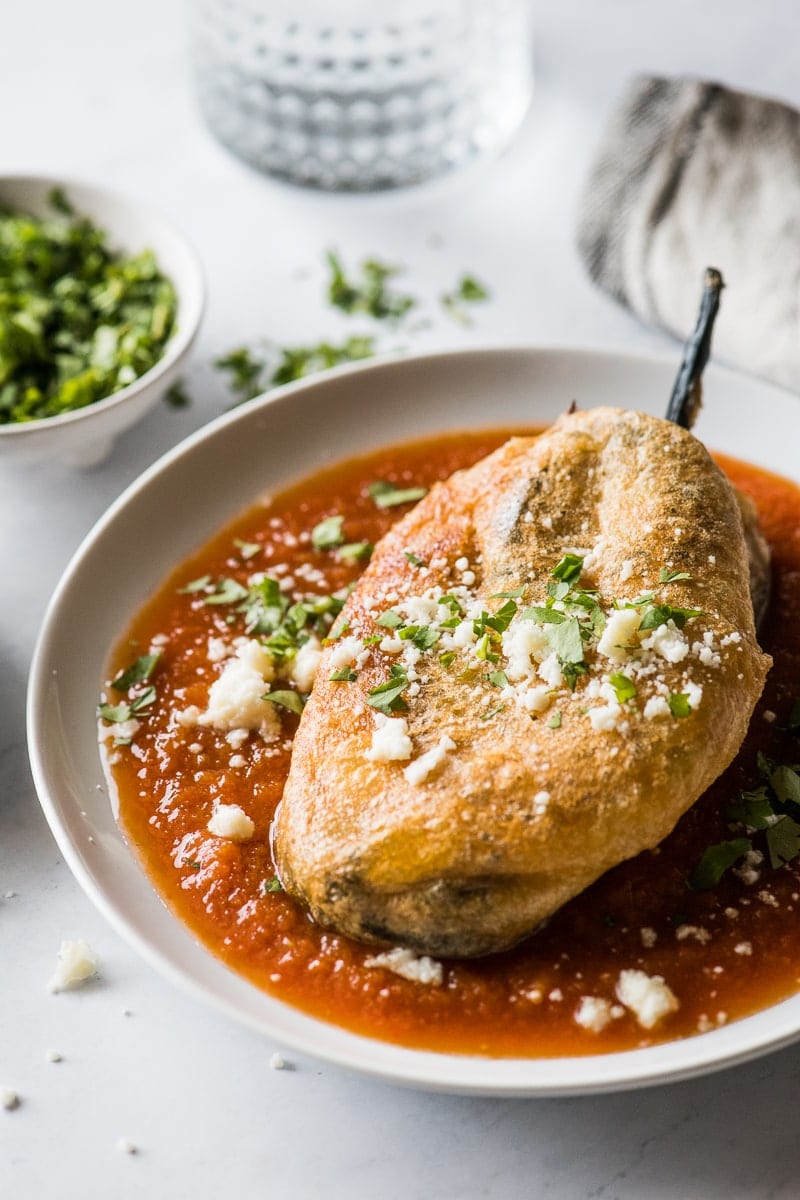
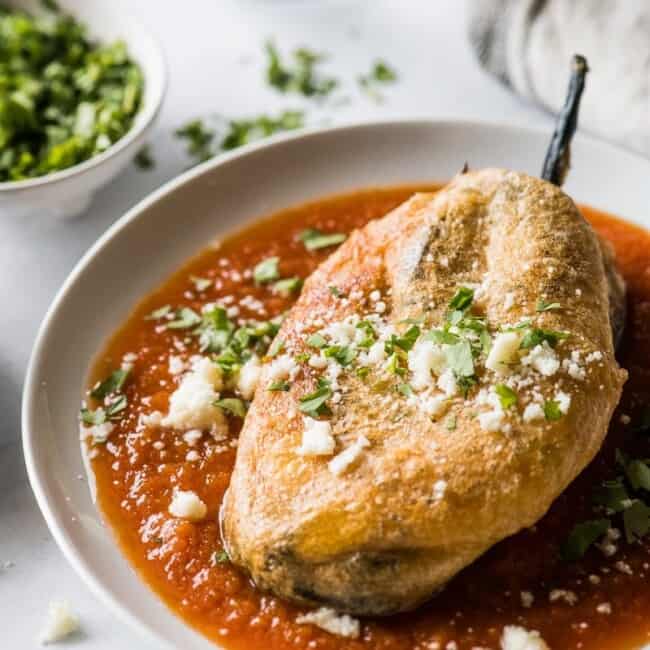
Transfer the chile rellenos to a baking sheet lined with paper towels to drain and collect any excess oil. Continue frying the remaining peppers and then serve immediately!
I served mine with a super simple red salsa made from tomatoes, onions, garlic, a jalapeño and cilantro, but that’s completely optional. You could use any salsa you have on hand (a salsa verde would be delicious with these), or just with a big dollop of sour cream or drizzle of Mexican crema.
Helpful tips and variations
- Buy the largest poblano peppers you can find. That way you can stuff the peppers with a lot of filling and you won’t have any leftovers.
- Use a different cheese. Feel free to use another type of cheese if that’s all you have. Traditionally, chile relleno is made with Oaxaca cheese, but you could also use mozzarella, cheddar, provolone or another good melting cheese.
- Add a different filling. To make this a more well-rounded one-chile meal, feel free to mix in some other ingredients to the filling. Some good options would be carnitas, shredded chicken or picadillo.
- Don’t overcrowd the frying pan. I typically fry 2 chile rellenos at a time even though the pan could fit 3.
More Mexican Recipes
Chile Relleno Recipe
Equipment
- Toothpicks, for securing the stuffed peppers
Ingredients
For the chile rellenos
- 6 large poblano peppers
- 8 ounces Monterey Jack cheese, cut into long strips/sticks (or shredded cheese)
- 4 cups oil, for frying
- 3 large eggs
- ½ cup all-purpose flour
- ½ teaspoon fine salt
For the salsa roja
- 6 roma tomatoes, quartered
- ½ small onion, halved (yellow or white)
- 3 cloves garlic
- 1 jalapeño pepper stem and seeds removed (optional)
- 5 sprigs cilantro
- 1 teaspoon kosher salt, plus more to taste
- 1 teaspoon olive oil
Instructions
For the chile rellenos
- Roast the peppers: Line a large baking sheet with aluminum foil and place poblano peppers on top. Set your oven rack directly underneath the broiler and turn the broiler on.
- Broil poblanos for 5 minutes, or until the skin is blackened and blistered. Carefully flip them over and broil for another 5 minutes, or until the skin is blackened and blistered.
- Remove them from the oven and loosely cover the baking sheet with aluminum foil or plastic wrap to keep in some of the heat and help them steam. Let them sit for 5 minutes.
- Peel the peppers: Peel and rub off as much of the loose skin on the peppers as possible. It doesn't have to be perfect, just as much as you can.
- Cut a small slit down the middle of the peppers with a knife. (If you don't want the peppers too spicy, you can remove some of the seeds. I like to leave them in as poblanos aren't typically super spicy to me, but that's personal preference.)
- Stuff the peppers: Carefully stuff the peppers with the cheese. Some of the peppers will be extra fragile because of the roasting process and may tear – that's okay. Just do the best you can.
- Gently close the opening of the peppers and secure it shut with 1-3 toothpicks. Use as many as you need to ensure that the cheese won't ooze out during the frying process. Set aside.
- Prepare for frying: Heat the frying oil in a large saucepan or deep skillet over medium-high heat. Line a baking sheet with paper towels and set aside. While oil is heating up, prepare the batter.
- Make the batter: Separate the egg whites from the yolks into two separate bowls – the whites into a large mixing bowl and the yolks into a small bowl. Using an electric hand mixer, beat the egg whites until stiff peaks form.
- While continuing to beat the egg whites on low, add in the egg yolks one at a time until all of them are fully mixed in. The batter should be light, fluffy and smooth.
- Coat the peppers with batter: Place the flour and salt into a separate shallow bowl or plate. Mix together to combine. Gently roll the stuffed peppers in the flour mixture, then give them a gentle tap to remove any excess. Then dip them in the egg batter and gently place them in the hot frying oil.
- Fry the chile rellenos: Fry the peppers for 3-5 minutes per side, until the batter is golden brown and crispy. Try not to overcrowd the peppers in the pan – I usually fry 2 at a time depending on the pan I'm using.
- Transfer the peppers to the lined baking sheet to drain off any excess oil.
- Serve: Immediately serve chile rellenos on a plate with some salsa, freshly chopped cilantro and some cotija cheese. (Don't forget to remove the toothpicks when you first cut into the peppers! You can try to remove them before serving onto plates, but I find it easier to remove them when you first cut into them.)
For the salsa roja
- Add tomatoes, onion, garlic, jalapeño, cilantro and salt to a blender. Puree until smooth.
- Heat olive oil in a small saucepan over medium-high heat. Add blended salsa and bring to a boil.
- Reduce heat to low and simmer, stirring occasionally for 8 minutes. Remove from heat, taste and season with more salt if desired.
Video
Notes
- Make ahead. The poblanos can be roasted and peeled up to 2 days in advance. The salsa roja can be made up to 3 days in advance. Both should be kept in the fridge until ready to use.
- Buy the largest poblano peppers you can find. That way you can stuff the peppers with a lot of filling, and you won’t have any leftovers.
- Use a different cheese. Feel free to use another type of cheese if that’s all you have. Traditionally, chile relleno is made with Oaxaca cheese, but you could also use mozzarella, cheddar, provolone, or another good melting cheese.
- Add a different filling. To make this a more well-rounded one-chile meal, feel free to mix in some other ingredients to the filling. Some good options would be carnitas, shredded chicken, or picadillo.
- Don’t overcrowd the frying pan. I typically fry 2 chile rellenos at a time even though the pan could fit 3.
Nutrition
Nutrition information is automatically calculated, so should only be used as an approximation.


This recipe was exactly what I needed. Thanks so much! Simple and delicious!
Fantastic recipe! Very authentic flavors and not too complicated. I love Chili Rellenos in a restaurant, but
honestly I thought these were better. The only complicated step was making sure the the toothpicks were removed, and finding large enough Chilis. Lucky for me my farmers market has had lovely chilis this summer. This is my go-to Chilli Rellenos recipe.
Good recipe .chilies came out beautiful, the sauce is a must.different cheeses also helps with different flavors. TY
I am going to try this recipe. Chile relleno is my favorite restaurant meal. I would like to know how hot the oil is. I do not cook with oil often, and I am not sure what temperature would work well with this.
Hi Cheryl! We aren’t sure about that since we did not use a thermometer. Sorry! We suggest waiting a few minutes for the oil to get hot and just watching and adjusting the heat as necessary.
This recipe is delicious, great directions. I used Anaheim chilies. For the rojo sauce I roasted the tomatoes, onions and jalapeno in the oven. And also added chili powder, garlic powder, onion powder and a dash of smoked paprika while simmering.
Can you use a deep fryer or should I just pan fry them?
Hello Nate! This recipe is pan fried but you are welcome to use a deep fryer!
Haven’t made them yet but I can tell they’re good just by reading this recipe Maybe a little bits of carnitas or pastor.
Isabel thank you for this recipe. 👨🍳
The Salsa was delicious! The peppers tasted great, although I prefer the restaurant chili relleno that is more eggier. Your instructions made things very simple, even though it is a lengthy process. I flunked the toothpick thing. I had to have my family watch out for the toothpicks as they ate them, and I had to use 4-5 to hold them together.
Very easy to make. Authentic flavors. My guest and I are very happy.
These are great! I did make the sauce with one jalapeno pepper as an option. I love Hot food, but the pepper I used turned out to have a ton of “heat” so I toned down the sauce by adding ketchup. I could have added tomato paste or tomato sauce. Just keep this in mind if you choose to add the jalapeno and then find it is hotter than you planned.
The directions on the Salsa Roja says to bring it to a boil and then turn down heat for 8 minutes and stir. For me, anyway, the sauce was too thin at 8 minutes so I kept stirring on decreased heat for a total of about 30 minutes to thicken up the sauce. I used a Vita Mix to thoroughly mix all the ingredients of the sauce before cooking and reducing down the sauce. The Roma tomatoes I used were quite large so I may have had more liquid than had I used smaller tomatoes and that may be why I had to spend so much time reducing down the sauce. The sauce is absolutely terrific!!
I used a VitaMix the first time and a hand mixer the second time to make the egg batter. The Vita Mix makes it in a flash. As for the flour, I found on the second batch that mixing corn meal, baking flour and some seasonings resulted in a very tasty coating once you have fried the Chile Relleno. I prefer adding some corn meal to the flour over just using flour.
I used vegetable oil with the first batch and a few days later made a second batch and used peanut oil to fry them. The peanut oil batch had the better taste. The recipe calls for a 3 to 5 minute per side frying time. I found out that mine were “just right” after frying in oil for 2 1/2 minutes per side, but of course that all depends on how hot the oil is. Using 3 minutes on a side was almost too much and began to border on burned edges. 5 minutes per side would have been really bad. The peanut oil will stand a hotter temp than many other oils and won’t smoke.
Something else I discovered with the second batch and that was that when roasting the Poblano peppers they don’t have to be all blackened to be well roasted and if you let the roasted peppers stand for a while ( 10-15 minutes or even longer) it seemed that they were so much easier to peel off the skin and work with and the peppers kept their shape and were thus easier to stuff with the filling than was the first batch where I roasted them until they truly were blackened.
As for the cheese, I used a mix of shredded Monterrey Jack and shredded Sharp Cheddar Cheese. Taste was terrific! I probably used double the 8 ounces called for by the recipe, but I like lots of cheese.
I have never made Chile Relleno before so this was an “experiment”. It took me longer by far to make the first batch. A couple of days later on my second batch it went much faster. For me, there was a “learning curve”.
I cooked only 1 to 2 of the very large Poblano Chiles at a time in the oil so the first ones had cooled by the time I finished the last ones, so I plated the Chile Rellano peppers at 2 to a plate and then spooned the sauce on top along with some added extra cheese mix and then popped them into the microwave just long enough to melt the added cheese and heat up the pepper and the sauce. Side dishes are obvious: rice and beans.
If you have never made Chile Rellenos before, then THIS is the recipe you should try. This will be a staple in my house from now on. Love these hummers!!!
Hi Bill! Thank you so much for sharing your cooking experience! We’re so glad you enjoyed this recipe!